Considerations -
1. When using one mic, having the performer sit, or raise their guitar close to their face usually works best. When using two mics, it's usually best to have them stand, and separate their guitar as far away from them as comfortable.
2. All of these methods have compromises. Compromises in tone, in isolation, etc. At the end of the day you need to make a decision about what you really need, and just go with it! This however does not mean you can't get a good sound! You absolutely can get a great sound recording a singer and an instrument at the same time. Stop being obsessive about the details that don't matter - what matters in the end is a good performance, and sometimes that is best accomplished with having the person play it live.
3. The more mics you start adding, the more phase problems will arise, especially in close proximity, so be careful. If you can get away with just one mic, go for it. If you're doing two and you want the least phase problems, I'd go for method 5, which seems to have the best phase coherency (to my ear).
4. Small diaphragm condensers will generally have less off-axis coloration, which is great in some cases, but bad in the case of isolation. That means it will make the bleed sound more clear / audible. Large diaphragm mics tend to have a colored off axis sound, even in cardioid, which works to our advantage when recording acoustic and vocals at the same time by rejecting the higher frequencies easier off axis.
5. If you're recording a paying client, be aware (and make them aware) that you can't do too much trickery later on in the mix. If they hit a wrong note, it can't be easily tuned without artifacts. If they miss a chord, or miss a word, they can't just punch in that on the vocal or the guitar - they have to do both. You, and they, need to be aware of this compromise. If they say later "can we add some reverb to my voice?" you will get a little bit of reverb on the guitar as well, just because of bleed. If they want you to cut out the vocal, or turn up the acoustic a lot, you may not be able to deliver. HOWEVER - the performance is everything. It's more important to get that right than it is to have a "perfect balance."
6. USE YOUR EARS!
METHOD 1: SINGLE MIC - CHARTEROAK 538
Clips 1 / 2 (Fingers and Pick) - A Single microphone, positioned around the player. This method is great if you only have one microphone, and the player is good. In the example on the podcast, there was quite a bit of room sound in this example, but that of course would vary depending on the room in which we record, and the position is something that depends on how he's playing in the exact take, on that exact song. The closer the mic is to the guitar, the louder the guitar gets; the closer it gets to his mouth, the louder his voice gets. It's as simple as that - you put one mic around a player and balance it by moving the mic. One pro of this method is that is stays out of the way of the singer, and they don't have to worry so much about moving.
.jpeg)
METHOD 2: SINGLE MIC CLOSE IN, SITTING - CHARTEROAK E700
This is my favorite one-mic method, which involves an omni microphone, very close to the player, with them sitting. The mic is positioned sort of in between the guitar and the mouth, and in this case, we used a DI to help support the sound. There's a trade off - the mic is in omni, so it's not super sensitive to movements, however, it's sort of up in the singer's space, which can be distracting. It's easy to knock with their guitar, and it's easy to be a distraction while they're trying to play. BUT - it sounds great.
.JPG)
METHOD 3: TWO FIGURE 8 LDCs - E700 AND 538
This is my favorite method for recording acoustic guitar and vocals. It involves two large diaphragm mics in figure 8 pattern, placed around the singer. Notice how, the null of each mic is facing exactly what we want to reject: the null of the vocal mic is facing the guitar, and the null of the guitar mic is facing his mouth. The downside - the acoustic guitar mic ends up being fairly awkward to position, and sometimes can sound a bit boomy, however, the isolation between the mics is great.
.jpeg)
METHOD 4: LDC AND SDC IN CARDIOID - 538 AND AKG 451
I see this method a lot, and I'm honestly not a big fan of it. The bleed is too strong, and it sounds kinda funky if you try to pan the SDC mic. The sound of the guitar and vocal seems to be the most upfront, but the bleed is annoying, and it seems a bit more phasey sounding than the others. Again, we're dealing with a compromise. Notice that the cardioid SDC is facing downward to try and reject as much as possible from the mouth, however, the null point on a cardioid mic is the rear, so it's not doing a ton. The bleed is very clear - it's not a dull bleed, which makes things harder.

METHODS 5 & 6: DYNAMIC VOCAL MIC + FIG8 ACOUSTIC MIC - SM7 + E700
These two methods were really great sounding. The isolation from the SM7 is great, as is the isolation from the E700. The TONE of the vocal mic is not as good as from the LDC, but the pros outweigh the cons. In Method 6, we did basically the same thing, except we added the DI, which helps to support some low end, and of course, has no bleed.
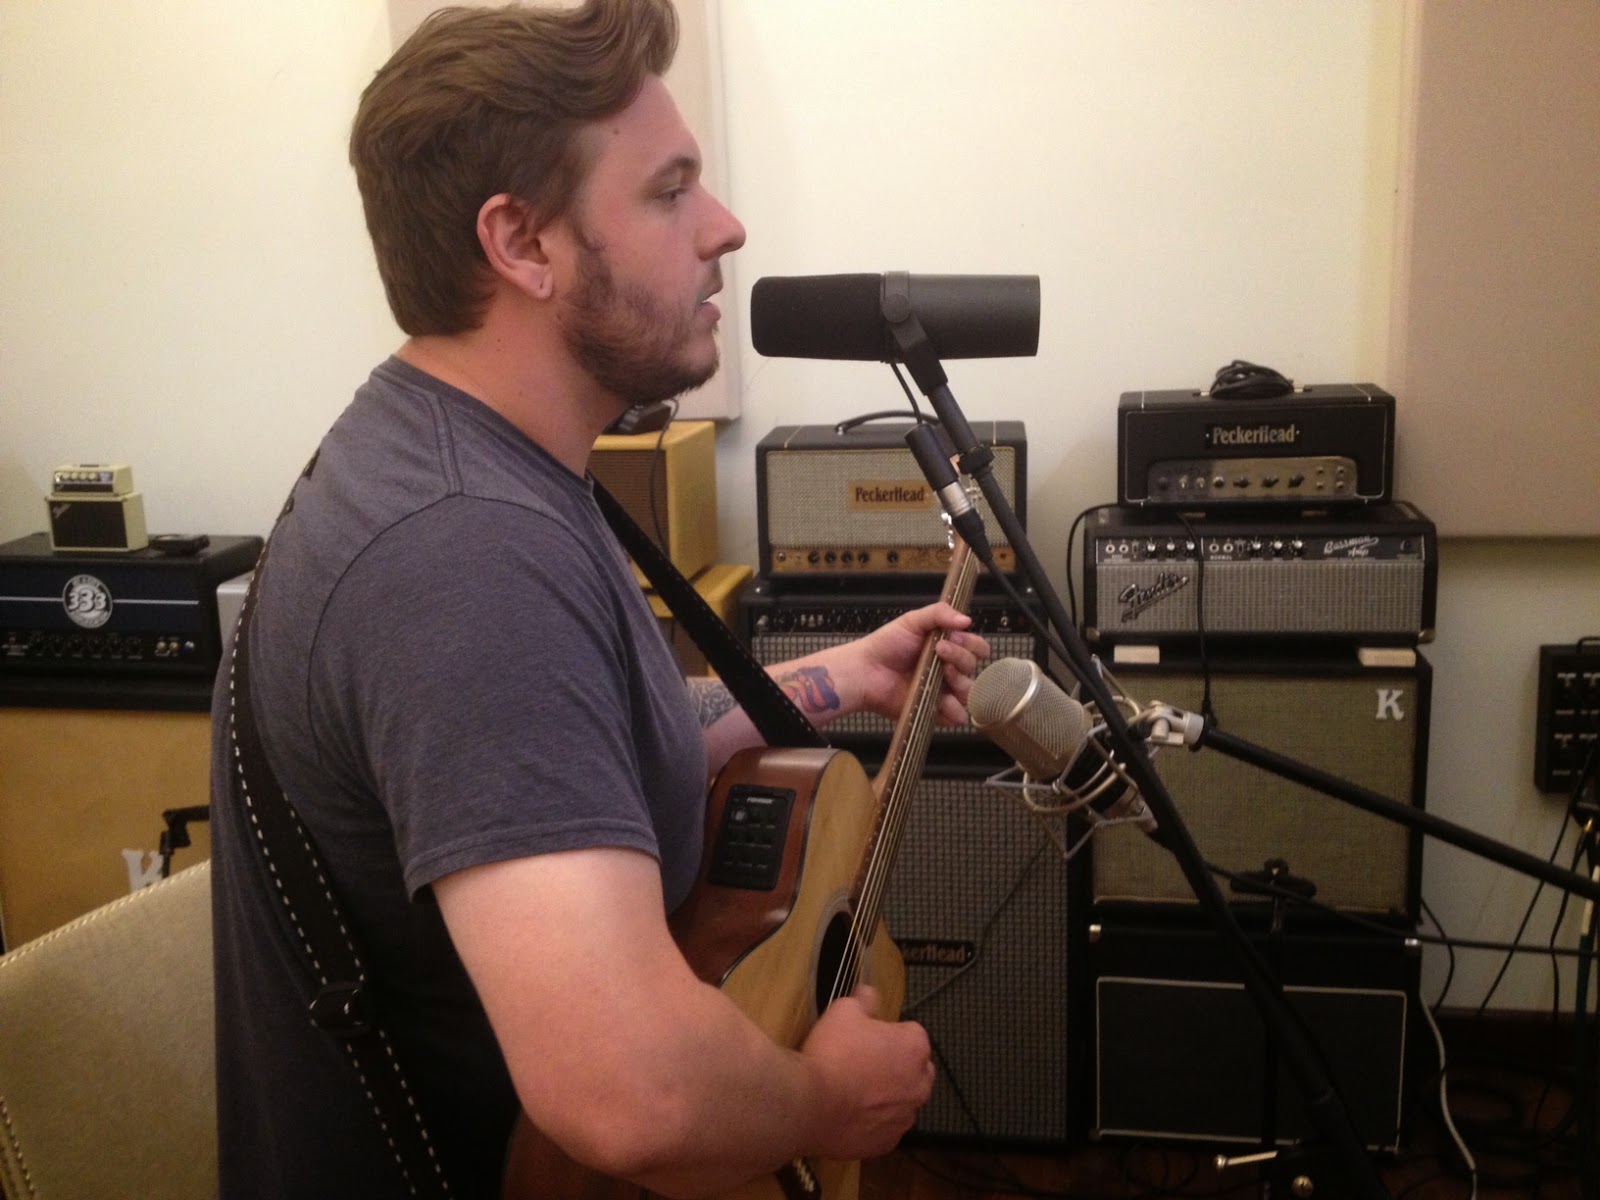.jpeg)